Reason for Cropping
- Remove/cut out unwanted objects to make image more aesthetically pleasing
- Fit image to graphic
Reason for Resizing
- Fit image to graphic
SHORTCUTS
Crop - cZoom Tool - z
Move Tool - v
BONUS TIP
If you want to resize manually (i.e. simply using your mouse), go to Edit> Free transform and drag the blue squares to adjust the width and height of the object.

PART A: CROP

CREATE A NEW IMAGE: Start with a blank image or one from the clipboard.
OPEN IMAGE FROM COMPUTER: Browse your computer to select an image.
OPEN IMAGE FROM URL: Specify an URL of an image to fetch.
OPEN IMAGE FROM LIBRARY: Images from pixlr, facebook, or other library. (You need an account for this).
 I copied the url of this image by francok35 from pixabay (copy image url by right-clicking image, then click copy image address).
Paste the url of your desired image into the dialogue box (or select the image you want to crop if you did one of the others). Then click 'OK'.
 |
| Navigator Panel |
Before cropping, you must be able to see the whole image.
This is done by using zoom. Look below for more details.
- Navigator Panel: Click on the sliding bar and slide it to the left to zoom out or the right to zoom in.
- Navigator Panel: Beside the navigator slider is a percentage zoom to manually input numbers or
- Use the percentage zoom at the bottom left of the screen (see arrow) to manually enter a zoom ratio (ex. 50%, 100%) in the percentage box.
- Zoom Tool: To zoom in, use the zoom tool (z) and tap the area you want to zoom into.To zoom out, use the zoom tool (z), then hold shift while tapping the area you want to zoom out of.
 |
| Zoom Percentage |
 |
| Navigator Zoom |
 |
| Zoom Tool |

Constraint are the limitations/restrictions put on cropping the image. Dropdown menu:
- No Restriction: Free cropping (no limitations on width and height)
- Aspect Ratio: A measurement of a photograph's width to height.
- Output Size: The document size in pixels.
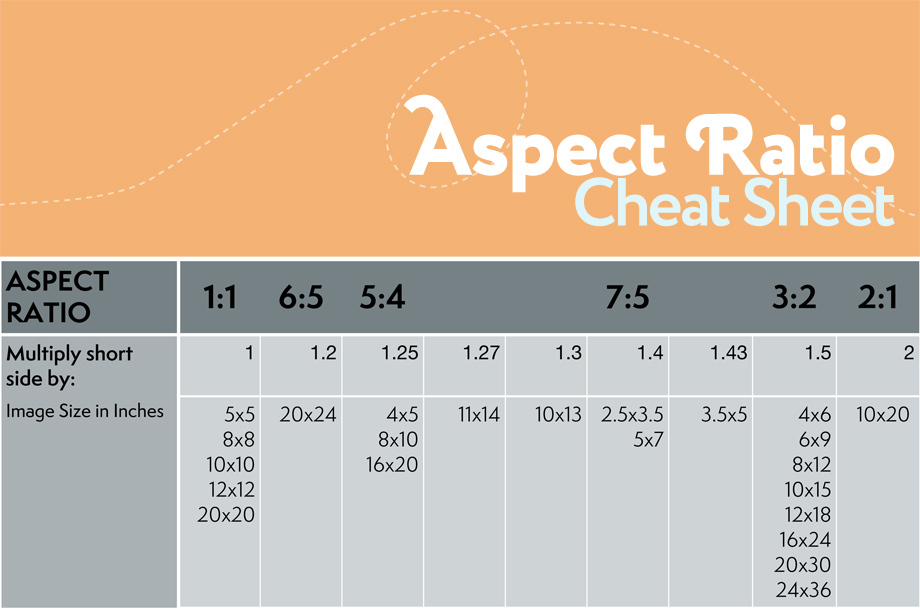 |
| "Aspect Ratio Cheat Sheet" from Paint the Moon |
Keep in mind output size is in pixels, so if you want to print something you need to convert inches/centimeters to pixels.
For simplicity sake, use the output size.
For reference, the beetle image is 960x637 pixels. Because the width is bigger than the height, I should adjust the size smaller than the height (output size must be less than or equal to 637 pixels).
Change constraint to output size. Then change the size to the desired width and height. I want a square crop, so I made it have a width: 500 px; height: 500 px.


Drag mouse along the image to the parts you want to keep and keep them in the blue bounding boxes.
Tap outside of the image, the grey area, for a confirmation dialogue box to appear.
Press enter if you want to accept changes.
Click no if you don't want to crop. Click cancel if you want to make adjustments to the crop options (i.e. constraint).
 Done!
Done!

HELPFUL LINKS
Graphic Sizes (Wattpad)Next, we will resize an image in case it is too big or too small. One thing I'd like to point out is that making a small image bigger will usually ruin the way it looks (ex. it will be blurry).
PART B: RESIZE
 If your cursor is still in crop mode, change it to your default/neutral cursor which is the move tool (v). If not, ignore this step.
Go to Image> Image Size from the menu bar at the top of the screen.
 A dialogue box will pop-up. Before you make any adjustments decide if you want the image to remain proportionate (if yes, leave constrain proportions checked; if no, uncheck constrain proportions). Typically, you want an image to be proportionate, however, there are some exceptions.
Click OK to agree or Cancel if you don't want to resize.

Hopefully, you get the point.
NEXT LESSON:
SELECTIONS
WANT PRACTICE?
Practice assignment will be posted on Wednesday, July 6th on the thread.
Comments
Post a Comment